
Indoor signs

2/25/2019
No matter how good the shop is at making signage, if the quality of the image for your sign is poor then the printed sign will also be poor.
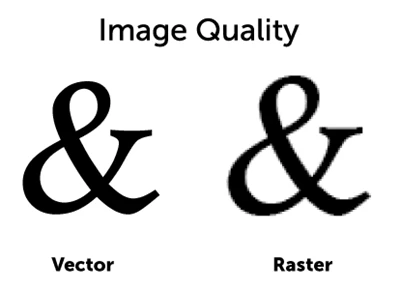
Pixelation occurs when non-vector files are resized to a point that individual pixels are seen. This results in blurry sections of your image or a general fuzziness to the entire image. To avoid pixelation, it is highly recommended that you use vector rather than raster images.
Images that are vector-based (.ai, .eps, .svg, and some .pdf) are mathematical in nature and revolve around lines and shapes. For example, when you draw a red circle in vector format, that circle is simply a mathematical formula. If you made that circle 100 times larger than you originally had it, the mathematical formula would still calculate a red circle. This means that no matter how you resize vector images they will scale properly and there will never be any pixelation.
Non-vector files, called raster graphics, (.bmp, .jpg, .png, .gif, .tif, etc.) are based on a grid of pixels. These small pixels represent certain colors that make up a bigger image. Because these types of images are resolution-dependent, when they are resized they eventually start to pixelate due to the pixels being “stretched” beyond their original size.
Vector files are by far preferred for any kind of large sign due to their ability to scale without negatively affecting image quality.
It should be noted that some things cannot be vectorized. Photographs and graphics with serious gradients, are two examples of images that cannot be changed to a vector format.
There are instances in which a raster graphic will work for larger signs. If you are using a non-vector based file then the file needs to be high resolution. This is determined by the PPI, or pixels per inch, and the image size. It’s important to note that PPI is often used interchangeably with dots per inch (DPI). A larger file size (generally greater than 1mb) usually will indicate an image that is high resolution but doesn’t guarantee that the image is high resolution. To verify if your image has the requisite PPI you can right click on the image on your desktop and click “Properties”. Once you have done this click on the “Details” tab. If you scroll down you will see both the image size and the PPI. On a Mac, open the image in Preview, click Tools > Show Inspector.
Images need to be at least 72 PPI but 300 PPI is preferred if you intend to use a non-vector file for your sign.
If you do not have a vector version of your artwork, try to find the original creator of the file and see if they have it in a vector version. Oftentimes, the original designer will have created a vector version of the file, but it never gets used because most uses are for small projects such as websites, letterhead, etc.
Something people try to do is create a higher resolution file from their pixelated image. Image editors such as Photoshop will allow you to resample the image and change the resolution. Unfortunately, when you do this to a pixelated file, you rarely get the result you are looking for.
This is the biggest problem people encounter when trying to create large signs. Almost everything you see on the web is at 72 PPI and will not look good if it is bigger than 3 to 8 inches tall, so if you are copying something from the web, you have to plan on those images only being a small portion of your sign. Photographs from your iPhone can be scaled to around 10”x 8” at 300 pixels per inch or 45”x 34” at 72 PPI. Photographs from a digital SLR (if on the right setting) can be 19”x 12” at 300 PPI or 80”x 53” at 72 PPI.
Raster images cannot be converted to vector images. The only way to convert these is to recreate the raster image in a vector editing software and save it as a vector file. Popular software options for doing this include CorelDRAW and Adobe Illustrator. These editing softwares attempt to go from raster to vector automatically, but the results vary greatly and are rarely adequate.
Going from vector to raster is very simple. Simply choose to “save as” and select a non-vector based image type when saving your file in your vector editing software.
Do you have questions on image quality or artwork resolution? Reach out to us at info@image360kcm.com and we will be happy to help.